
Installing a tip-up garage door and jam arms can be a bit of a daunting task, but with the right tools and a little bit of know-how, it can be done relatively easily. In this blog post, we will go through the basic tools required for the job and the step-by-step process of installing the door.
Getting ready
The first thing you will need is a tape measure. This is essential for measuring the height and width of the door frame and ensuring that the jam arms are placed at the correct height. You will also need a pencil or marker to mark the locations for the mounting holes.
Next, you will need a drill and a socket set. The drill is used to create pilot holes for the screws that will secure the jam arms to the door frame. The socket set is used to secure the jam arms to the door frame by screwing them into the pilot holes.
You will also need a spanner set and 5mm spacers. The spanner set is used to adjust the tension on the garage door springs, which are what make the door open and close smoothly. The 5mm spacers are used to create a gap between the bottom of the door and the floor, so that the door does not scrape on the floor after everything has been fastened.
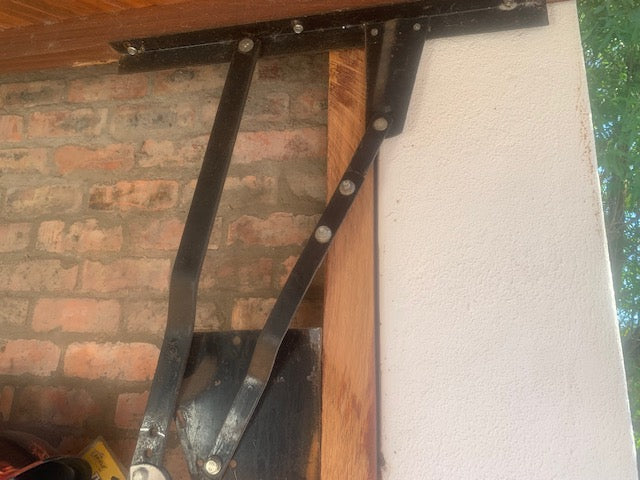
Marking out the jam arm location
Now that you have all of your tools ready, it's time to start the installation process. Firstly, before anything is mounted, you have to measure and prepare. When installing the jam arms, it is important to measure accurately to ensure proper placement. To do this, use a tape measure to measure 485mm down from the builder's opening on both sides of the door frame. Then, measure the thickness of the door and add this measurement to the 485mm. This will give you the final mark for the placement of the jam arms on both the left and right sides of the door frame. Take note that when you place the jam arms to be fastened against the wall, the top of the jam arms facing the wall must be on your final mark of placement.
Mounting the jam arms
Once you have determined the final mark for the placement of the jam arms, align the top edge of the jam arm with the mark and use a pencil or marker to mark the locations for the mounting holes. Then, use a drill to create pilot holes and secure the jam arm to the door frame by screwing it into the pilot holes. Repeat this process for the other jam arm on the opposite side of the door frame at the correct measured height.
Mounting the Tip Up Door
After the jam arms are installed, it's time to mount the tip-up door. Place the tip-up door in the closed position with the jam arms parallel to the door that is in the closed position. Insert a 5mm spacer on the bottom side of the door so that there is a gap so the door does not scrape on the floor after everything has been fastened. Secure the tip-up door to the jam arms by attaching the brackets on the door to the jam arms with the provided hardware.
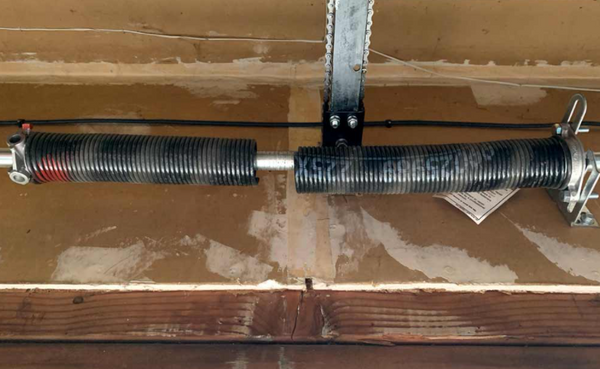
Installing the springs for the Jam Arms
The final step is installing the springs. The first step is to open the door to its fully open position. This will allow you to easily install the springs on both jam arms.
Take the spring and place it on the arm in the open position. Make sure that it is properly aligned and securely attached. Repeat this process for the other jam arm.
Once the springs are installed, it's important to adjust the kicker plate and spring tension. This will ensure that the spring does not dangle loose and that the door is properly balanced. Make sure that the tension on both sides is exactly the same to ensure the door balance and safety.
It is important to use caution when working with garage door springs as they are under high tension and can cause serious injury if handled improperly. Therefore, it is important to make sure that both springs have the same tension to ensure the door balance and safety.
Checking the installation
Finally, test the door to ensure that it opens and closes smoothly and make any necessary adjustments to the spring tension or the position of the jam arms. This will ensure that your tip-up door is properly installed and ready to use.
In conclusion, installing a tip-up door may seem like a daunting task, but with the proper tools, measurements, and instructions, it can be done with ease. The key is to take your time, measure accurately, and use caution when handling high tension springs. Following these steps will ensure that your tip-up door is properly installed and ready to use for years to come.
Feel free to contact the Garage Door Spares technical support team if further assistance is required or go visit our preferred installers page to get it installed by a reputable garage door installer.
Here you can find the Tip Up Jam Arms Installation Manual
We would like to thank Peninsula Garage Doors for writing the manual for us. They can be contacted on the details below:
Web: peninsuladoors.co.za
Email: info@peninsuladoors.co.za
Cape Town branch: 078 949 8130
Gqeberha/Port Elizabeth branch: 063 462 4003